Wednesday, August 30, 2006

Shuichi - Begin the cloak attempt one

-------------------------------
Time: 6hrs
Total Time : 21hrs

-------------------------------

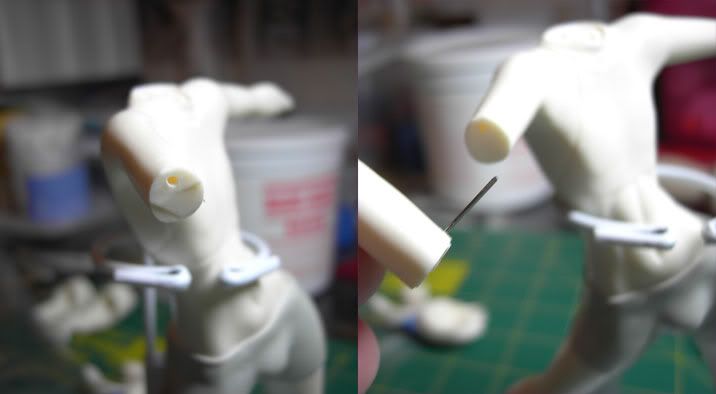
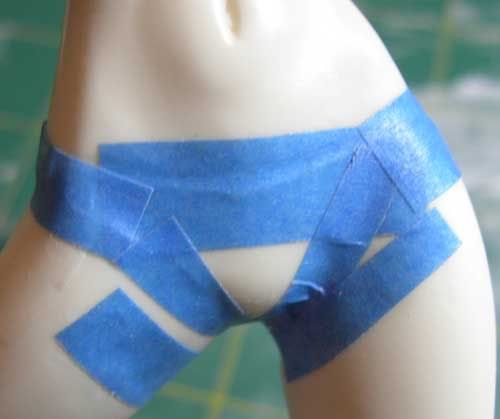
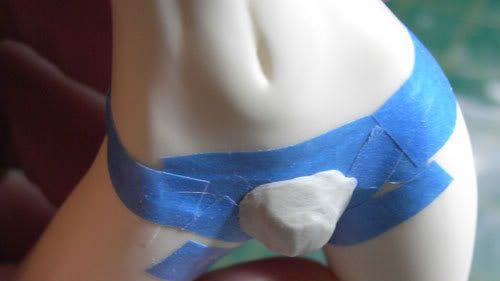
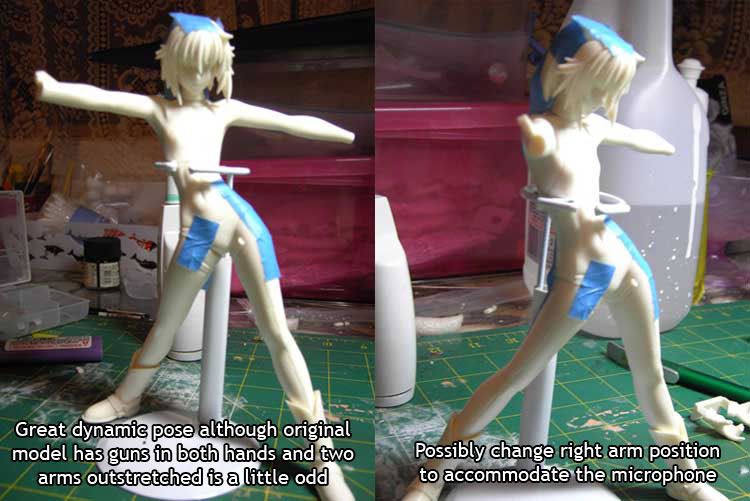
Finally another update! I’ve taken on a second job and I’m very busy with band work also so my favourite hobby is being neglected!!! Never mind, I thought I’d make up for it by spending all these hours over the last few days. This cloak DROVE ME NUTS, but in the brain department. I started 3 days ago by taping up Shuichi’s torso so I could streamline it so I wouldn’t get all the bumps and seam lines from the crop top and the pants. That was pretty quick, then I played with so many different types of material draping over the torso so I could lay down some magic sculpt for the cloak. This was also to stop the magic sculpt sticking permanently to the figure. Once it dries its bond is really strong depending on the shape of what you have put it on and I don’t want to make the cloak a permanent part of the model.

Foam, aluminum foil, sticky tape and baking paper all failed me, at this point I had lost 4 hours and a few insanity points and decided to give up and think about it. Over the next 2 days I narrowed down the options to either using real PVC or leather as the support for the resin or wires. I went with wires and got into it tonight. I readied my magic sculpt resin, flexible 16” wire, florist wire, wire cutters, 3M tape, talcum powder, cling wrap and Klean Klay (not pictured).

I left Shuichi in the doll stand and put some Klean Klay around the base of the stand and on his feet so he wouldn’t move around. Then some blobs of clay were put around the base in the 
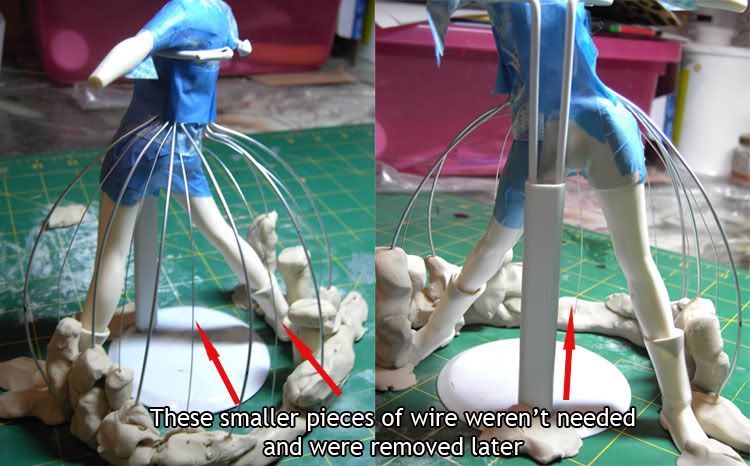
general shape of how I wanted the cloak to sit. The clay is so easy to work with and it never ever dries out. I then cut some pieces of wire off and because of the shape of the wire roll most of them had an ideal curve for the shape I wanted. I just flattened about ½ an inch on each piece so I could rest it and tape it against the torso. I wanted to have the cloak have very big creases so I placed florist wire in between the larger wire but below each one to create an ‘s’ pattern. Once I started playing with the cling wrap I found I didn’t need them and they were just in the way so I ended up pulling them all out!

I then covered the wire with cling film, this was a little tricky. It 
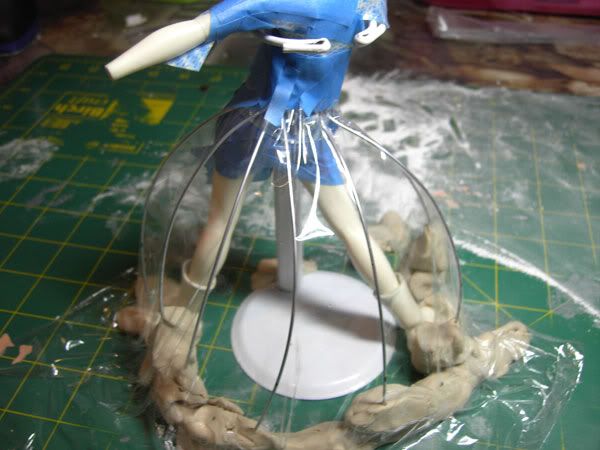
was basically a rectangular shape with an ellipse removed in the middle of one of the longer sides so it didn’t gather too much around the waistline. Took a fair bit of pulling to get it to sit how I wanted it. I stuck down the edges to the clay.


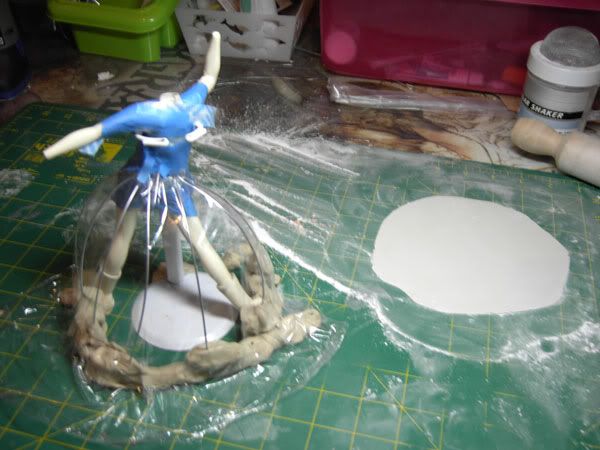
I then mixed up two balls of resin just over an inch each in diameter and rolled it out with a rolling pin using LOTS of talcum powder or the ball can be left to cure 20 minutes 1st. I rolled it very thin.


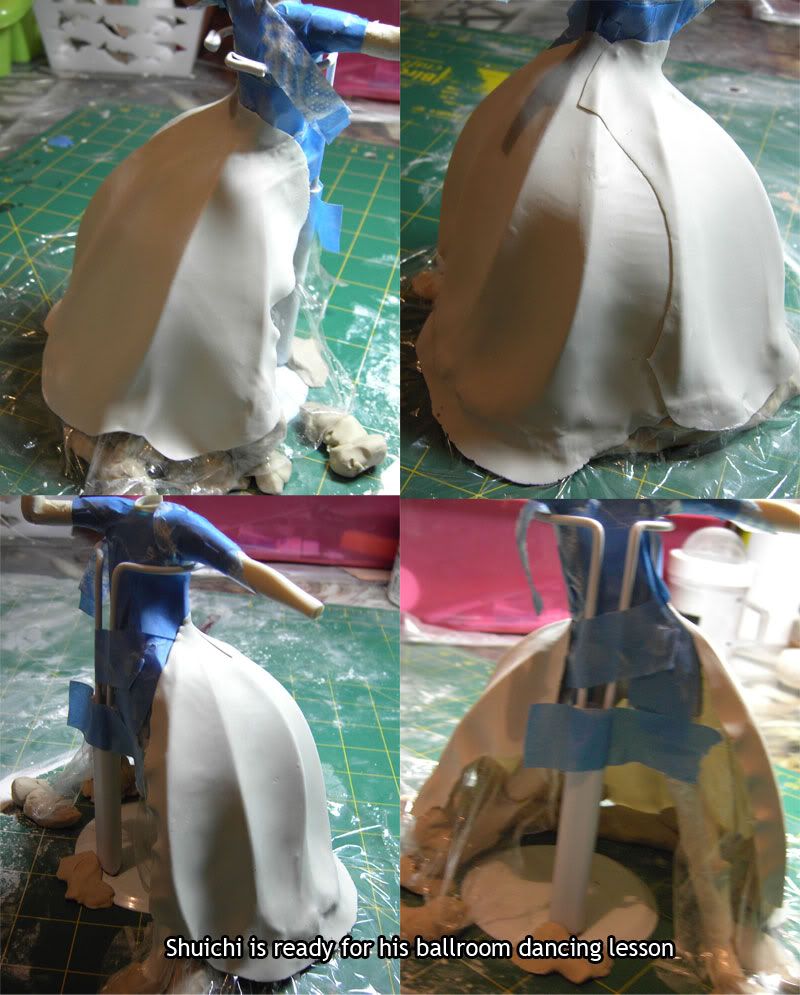
I then draped this piece over the wire frame but it only covered about 2/3 of it. I gently held the piece that rested against Shuichi’s lower back while gently pressing it over the wire frame. The creases formed at exactly the depth I wanted which was great. By the time I had spent a few minutes forming the resin over the frame the top of the resin had bonded very slightly to his lower back and I didn’t need to hold it up anymore. The whole thing, wire frame and resin are made longer than needed; this cloak only needs to come to the top of his boots so I’ll clean up the hem of it later. I rolled out a smaller piece of resin and repeated the process. Now Shuichi is ready for a ballroom dance I think, or maybe he belongs in the civil war with that skirt!!!! I’m hoping it won’t look so girly once I trim the hem.

Thursday, August 03, 2006

Shuichi - Crop top

-------------------------------
Time: 2hr 30mins
Total Time : 15hrs
-------------------------------
Straight back into it today!!! I’m going away for about 4 days so I thought I’d made the most of today and get the top done. The collar and existing crop top is really not good so I decided to remove the collar altogether and also sand down the lines on the existing top. This is because the magic sculpt conforms very well and when I made the shorts the masking tape was showing through the magic sculpt then!

Next I marked with a pacer the guide lines for the clothing, providing the coat lines stay on after I sand the crop top otherwise I’ll need to do them again. These were all measured and marked as accurately as possible with a ruler. The model then gets a once over with some alcohol on a cotton bud to ensure that the magic sculpt doesn’t slide off too much.

This time I did the same as with the shorts, made a series of small pieces of rolled out magic sculpt and blended the overlapping lines together. I didn’t take any mid way pics as it’s the same as before. Some areas needed to be flattened as the material looked a bit thick!! Other areas need extra pieces laid on top. All in all it took two and a half hours but that’s including the collar removed and preparation sanding.


I used lots and lots of talcum powder this time and realised that it has the same effect as smoothing with water but works even better. I can achieve an almost polished look so easily now which will reduce sanding time.

This will cure overnight but no more work is going to be done until next week!! I’m dreading that cloak.

Wednesday, August 02, 2006

Shuichi - Finally another update!!! Repositioning the right arm

-------------------------------
Time: 1hr 15mins
Total Time : 12hrs 30mins

-------------------------------

I decided the two outstretched arms just didn’t suit what I was looking for so I thought I’d chop one and bend it upwards, this will be the microphone hand and the other hand will be holding the microphone stand. I was a bit scared about chopping and having to reform the elbow. Next time I do this I’m going to mark where the pieces joined because as soon as I chopped I couldn’t figure out which was the arm went back on once I had it in the new position!!! I used the cutting tool on the dremel to slice the arm, didn’t take very long at all although the cut was a little messy.


I pinned with a sewing pin as the wire I had was a little thick for this piece.


The gap left in the elbow was mammoth so I used some magic sculpt to reshape.


After some rough sanding and polishing the elbow is done! I broke the hands off the sprues so I could see how it all looks together, so far so good, I may have to muck around later to ensure they sit how I want.


Sunday, July 16, 2006

Shuichi - Sex change part two and short shorts!!!!

-------------------------------
Time: 2hrs
TotalTime : 11hrs 15mins
-------------------------------

I used ‘Magic Sculpt’ to make the shorts. You just take equal parts resin and hardener by rolling into little balls and eyeballing it, that’s all, then mix thorough by squeezing the two parts together. It’s good to put a little talcum powder on your fingers beforehand to prevent sticking. If you leave the mixed parts for about 5 minutes before working with it, it looses it stickiness anyway, but I still use talc on my hands, mat and rolling pin like you would flour for pastry. This product rolls out really thin. It conforms so well and is perfect for clothing. I masked off the panty lines and other gaps to even out the surface and the rolled piece STILL showed through these imperfections, I was very surprised.


I put a small blob of the mixture on the pelvic bone before laying out the rolled out piece, I don’t think he needs to have a ‘Ken’ style flat area, not in my opinion anyway! The rolled out piece is cut into two for front and back, it’s no particular shape, just an odd round shape that I trimmed once it was on the model. The piece is rested on top and it conforms by itself in the major areas although underneath the pelvic area needed a little push!!!

The process was then repeated on the back of the model and extra strips were added around the waistline as the shorts were sitting a bit low and some of the shapes of the masking tape underneath were showing through. Also there were some gaps on the inner thigh so more pieces added. You have a few hours working time with this product so it’s nice and easy and no rushing.

The whole lot then needed to be trimmed and smoothed out. I used some florist wire to wrap around the legs to cut the shorts to size, then a hobby knife to make a straight edge because the wire kind of pushes the edge out, used the same process for the waist line. The best part of this product is that you don’t have to bake it like many of the other hobby sculpting materials. It can be placed over anything, sticky tape, foil, cling wrap whatever you want to use. The shorts and crop top will be easy because there isn’t any shaping, but if you are doing skirts or cloaks (like I have to do later) the you can use sticky tape, foil or even material to create the shape of the clothes and then lay the ‘Magic Sculpt’ on top and it will drape naturally.

To smooth and blend all the pieces and seam lines I just used my fingers and toothpicks, the rolling motion of the toothpick is enough to mould but not alter the thickness or shape too much.


Once the shorts were shaped I smoothed the surface with my finger and water. It smoothes out really well and I put extra work in here so I can hopefully eliminate the amount I need to sand afterwards. This was left to cure overnight.


Tonight I sanded the shorts down with rough, fine and extra fine sandpaper. There are some gaps that will need filling that can’t be fixed with sanding. I may prime this area to see how it looks.

Thursday, July 13, 2006

Shuichi - Sex change part one, boots also fixed + other minor fixes

-------------------------------
Time: 45mins
Total Time : 5hrs 15mins
-------------------------------

I leveled off the boots last night with some ‘Magic Sculpt’, this was left overnight to cure. I had some extra time tonight so a fair bit more was achieved than expected! Sanded down the ‘Magic Sculpt’ now the boots are done. I will probably add some wire or something to them later on down the track so I can get those red rings that are around each boot. I’ll check out the hardware store sometime to see what I can find.


The rings on the top of the thighs needed to be removed. Tight bicycle pants are being added to this model so I didn’t want any bumps coming out past the normal curve of the skin. Next the torso was fixed, this is part one of the official sex change!!! I took before and after pics of a few angles.


Tattoo needed to be removed but I only sanded it off on the areas where the final skin will be exposed. The rest will be under the new crop top.


I’ve decided I want to permanently attach the legs to the torso for ease of sculpting the bike pants he’ll be wearing. This pose is so insane, it’s almost impossible to hold the legs together with the torso even with tape. Is this tactical error number one? I don’t know but I’m going with it. I used a pin vice to make the pinholes and cut the tops of some nails for the pinning. I didn’t want to use wire or anything that bends because I the pose places a lot of stress on the pieces. As I’ve yet to finish a normal resin kit, I don’t know which is stronger out of epoxy glue and superglue, so I’m going to use epoxy on the right leg and superglue on the left. I can’t imagine either of them will ever pop out but if they do I’ll be up the creek as I’m sculpting over the top. However, when I finish this project I’m not going to be painting my original, I’ll make a cast and paint that.

Wednesday, July 12, 2006

Shuichi - Boots sanded and ready for modification

-------------------------------
Time: 1.5hrs
Total Time : 4.5hrs

-------------------------------

This time the boot only took 1 hour to sand!!! I did remember to take progress photos on how I the excess resin off. First dremel, then hobby knife, then 240 coarse grit sandpaper, then finer and finer sandpaper until it’s done! I spent some more time afterwards on the other boot just with a coarse grit to even out some bits and back up the grits to smooth it out. In future I wont use the higher grits, it's not needed to be that smooth in the end.

Tuesday, July 11, 2006

Shuichi - Sanding sanding . . . . .

-------------------------------

Time: 1.5hrs
Total Time : 3.0hrs
-------------------------------

Well I made an official start, I sanded one boot and it took far too long!!! I used a dremel to sand off the bulk of it, then shaved some of the excess with a hobby knife, sanded by hand and polished with my toothbrush sander. Hopefully the second one will be quicker. I still have to level out the rim so it isn't a cowboy boot. If I can sand the other boot quickly enough I'll have a play with the magic sculpt tomorrow.

Monday, July 10, 2006

Garage Kit Build - Shuichi Shindou from Gravitation

-------------------------------

Time: 1.5hrs
Total Time : 1.5hrs
-------------------------------

After my ongoing protests on various hobby forums about the lack of male kits I thought I’d stop whining and start playing. I’ve decided to start with Shuichi Shindou, the main character of the Gravitation anime/manga created by Maki Murakami. I’ve chosen the anime version as I prefer the character design over the manga for Shuichi in particular. He's not really one of my personal favourite male characters but he should be easier than some of the others I have in mind. I’m a beginner, I haven’t finished building/painting my first model kit but I want to have a go at kit bashing now and build up my skills as much as possible.

I took some pictures of the kit as it is. The pose is good. A lot of the kit bashing will be "adding" to the kit rather than changing it. I have to add to cloak, clothes and accessories.


The clothes will need to be sanded down even though the original model has a crop top and so does Shuichi. It still needs to be created from scratch. The boots are pretty good and will only need some minor adjustments.