


I'm not sure how much of this project I'll reveal. I guessing (I'm soooo optimistic) that it's not going to be as involved as all my other projects as there's going to be very little modification needing to be done with the existing models.
They won't be all that large, about 25cm and they'll be standing. I have other projects in mind involving these two, after all it was a long time ago that I watched Evangelion, it aired in Australia before you could purchase the videos as DVDs weren't around then. It impacted on me alot and fueled my current love for anime.
Wednesday, November 28, 2007


New project
Although there are a few models available of Bridget, I've still been wanting to mod one for over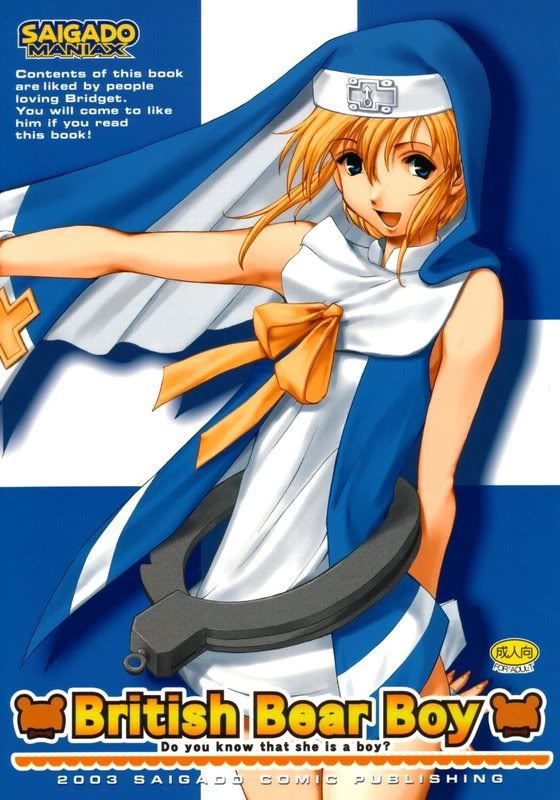 a year now. There are some gashapons, a new PVC is coming out soon and the resin ones never surfaced. The other reason I wanted to make one is the size, I wanted it big. The PVC coming out soon is 22cm and I don't really go much on the "victim" pose he's in, he looks like he's concerned for his safety, here's a link if you need to see.
He's 157 cm tall and the model I'm using is 40cm so a scale of about 1/4. I really wanted to use this model but she's been on preorder with e2 for 10 months now and shows little likelihood of ever going into production.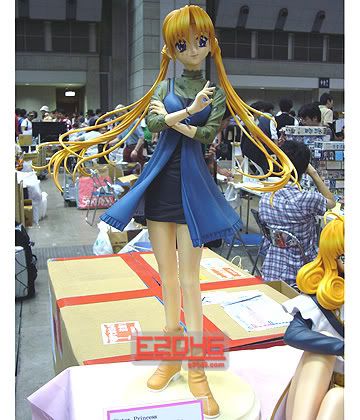
So I've ended up purchasing this little magic user as she was in stock at Hobbyfan and reduced significantly as they have a big sale at the moment. She actually has her arms in a much better position that Sakuya and her face is a little more like Bridget than Sakuya. Also she already has those wrist pieces and her arms exposed making for a little less work. Her arms are positioned much better also. The only downside is her hair is attached to her head.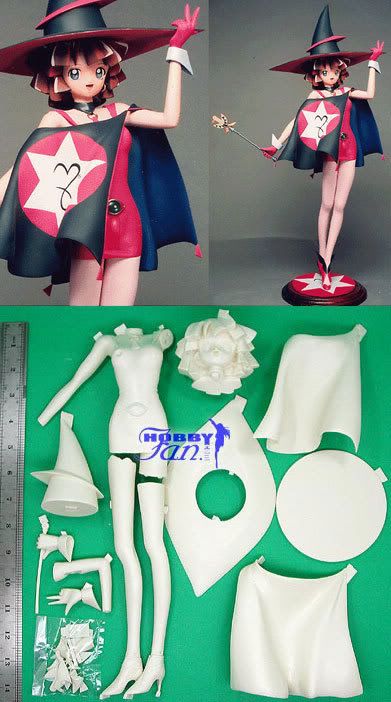
I'm going to be modelling him off a Saigado doujin cover picture for now.
a year now. There are some gashapons, a new PVC is coming out soon and the resin ones never surfaced. The other reason I wanted to make one is the size, I wanted it big. The PVC coming out soon is 22cm and I don't really go much on the "victim" pose he's in, he looks like he's concerned for his safety, here's a link if you need to see.He's 157 cm tall and the model I'm using is 40cm so a scale of about 1/4. I really wanted to use this model but she's been on preorder with e2 for 10 months now and shows little likelihood of ever going into production.
So I've ended up purchasing this little magic user as she was in stock at Hobbyfan and reduced significantly as they have a big sale at the moment. She actually has her arms in a much better position that Sakuya and her face is a little more like Bridget than Sakuya. Also she already has those wrist pieces and her arms exposed making for a little less work. Her arms are positioned much better also. The only downside is her hair is attached to her head.
I'm going to be modelling him off a Saigado doujin cover picture for now.
Sunday, November 25, 2007
Migration Process
You may notice new posts appearing that are not dated this year, this is because I'm migrating the old posts over first before I make new ones ^__^
Friday, July 27, 2007
Belt, cloak priming again
-------------------------------
Time: 1hr 22mins
Total Time : 88hrs & 27mins
-------------------------------
 Short session today as I’ve gotten as far as I can with a few things and need to wait until morning to get back into it. First I added some more bands onto the top belt. The bands were added by painting with Mr Dissolved Putty, this stuff dries within a minute or so and I layered probably about 6 times to get this thickness.
 Next I primed the coat again, this time used a more expensive spray can, duplicolour and I’m not getting the spitting. Although I’m still only spraying probably four quick passes and the dunking back in the warm water. Warning DO NOT PUT SPRAY CANS INTO HOT WATER only warm. I didn’t take a photo but one of the cans nearly blew up, I was so panicked that I just lobbed it and didn’t want to be anywhere near it!!! I’ll go dig it back out of the garden another day and take a photo o_O. After wet sanding with extrememly high grit sandpaper, 3000 maybe? I’m not sure, it’s Tamiya and it has a furry kind of backing instead of just paper, it doesn’t have the grit on it and it was given to me by a fellow forum member so I can’t remember the grit. It doesn’t take much paint off though and gets the surface nice and smooth. I then finish with a coffee filter, that really brings up the shine. The previous paint didn’t need sanding with sandpaper, only the coffee filter, duplicolour has a rougher surface though so it needed it and it’s a small price to pay as opposed to all that spitting.
Time: 1hr 22mins
Total Time : 88hrs & 27mins
-------------------------------
Short session today as I’ve gotten as far as I can with a few things and need to wait until morning to get back into it. First I added some more bands onto the top belt. The bands were added by painting with Mr Dissolved Putty, this stuff dries within a minute or so and I layered probably about 6 times to get this thickness.Next I primed the coat again, this time used a more expensive spray can, duplicolour and I’m not getting the spitting. Although I’m still only spraying probably four quick passes and the dunking back in the warm water. Warning DO NOT PUT SPRAY CANS INTO HOT WATER only warm. I didn’t take a photo but one of the cans nearly blew up, I was so panicked that I just lobbed it and didn’t want to be anywhere near it!!! I’ll go dig it back out of the garden another day and take a photo o_O. After wet sanding with extrememly high grit sandpaper, 3000 maybe? I’m not sure, it’s Tamiya and it has a furry kind of backing instead of just paper, it doesn’t have the grit on it and it was given to me by a fellow forum member so I can’t remember the grit. It doesn’t take much paint off though and gets the surface nice and smooth. I then finish with a coffee filter, that really brings up the shine. The previous paint didn’t need sanding with sandpaper, only the coffee filter, duplicolour has a rougher surface though so it needed it and it’s a small price to pay as opposed to all that spitting.
Tuesday, June 26, 2007
Cloak priming & made the belts on the shorts
-------------------------------
Time: 9hrs 33mins
Total Time : 87hrs & 5mins
-------------------------------
 It’s been a whole month since I did anything!!! Argh, got sidetracked with other things like trying to make moulds and then buying a ball jointed doll!!!! I’ve made some good progress with Shuichi and he’s finally looking reasonably like I want him to. I really need to knuckle down and finish this as I have a commission mod to next and I’ll like to get started as soon as I can. First I had to fix this messy cloak, the never ending cloak, after spending many hours sanding (again) and filling the messy bits with putty, Mr Surfacer and Mr Dissolved Putty I was ready to prime to see the real uneven surface under the even gray colour as it’s difficult to see as is.
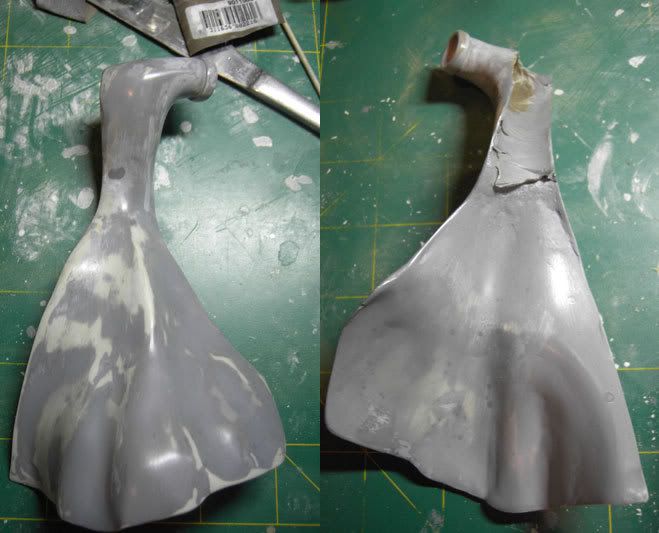
I’ve had ongoing issues with spray cans and this was no exception, after about 3-4 quick passes my cans spit like crazy thus creating me extra work as I have to sand these spots off and prime again. Anyway I finally developed a technique involving two spray cans and a pot of warm water, after two sprays the can goes in the pot then I use the other can while the first can is warming back up. I alternated with this and left about 20 minutes or so between coats. I didn’t prime the model completely just a bit to get started and identify some problem areas of which there were PLENTY. I didn’t photograph them all but here’s a few circled.
 After light sanding to smooth the surface and some puttying and more Mr Surfacer I’m ready to prime again. I like the finish and although I can’t really tell until it’s primed again, it looks smooth and even to me!!
Next I attacked the shorts. I needed to make two belts with the two buckles. I toyed with the idea of making the belts from magic sculpt but was concerned that I wouldn’t be able to get the straight line, I also though some sort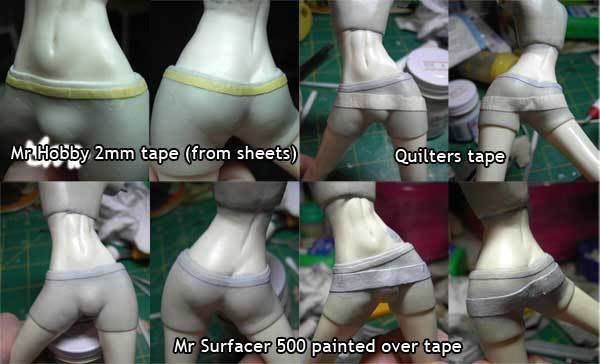 of ribbon or leather string would work but they were both hard to work with so I ended up going for masking tape. I used Mr Hobby masking sheets which are precut to 1mm and 2mm, it was perfect for the smaller belt. I then handpainted Mr Surfacer over the masking tape to even out the surface and give it some strength. Then I used quilters tape for the bigger belt. Quilters tape is good because it’s not uneven at all and it’s really thick, it’s thicker than masking tape. I also used Mr Surfacer on it.
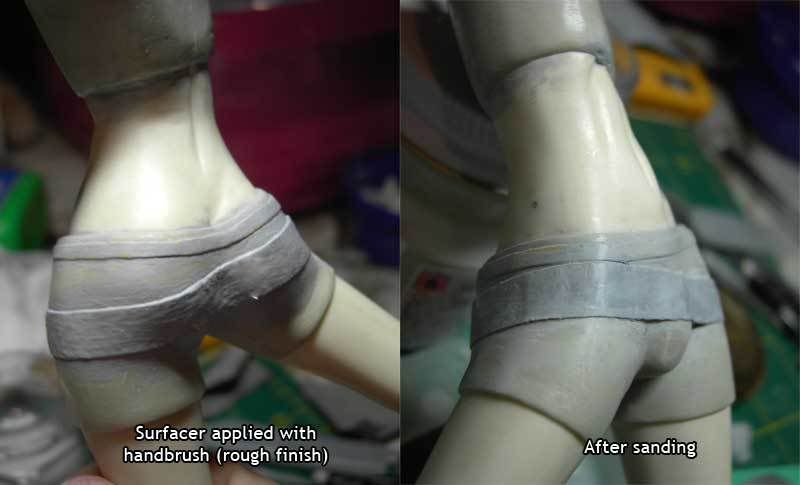
Then I lightly sanded the surface and cleaned it up along the edges with a scalpel until it looked pretty smooth.
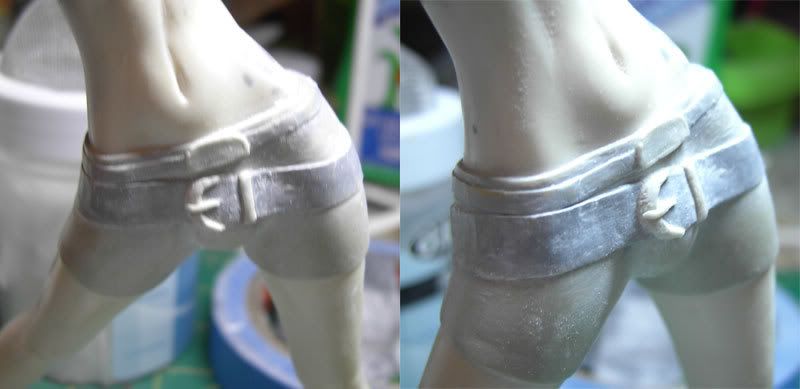 Then I used some Magic Sculpt to make the top and bottom buckles, this was very tricky. I started out using a curved carving tool to shape and manipulate but the buckles would keep falling off or moving slightly. Then I used a pin to carefully go around the outlines of the pieces and press them on to the belt, then I could manipulate the shape of the pieces, I opted for a rounded buckle in the end instead of a square one. The picture is of the initial bits before they are cleaned up.
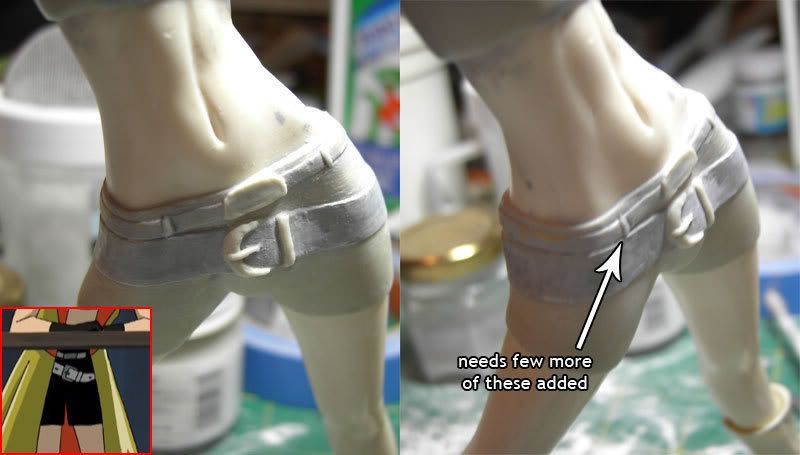 I then cleaned up the debris with a dry paintbrush and used the pin to hollow out any corners that had talc in them. You can use Magic sculpt with talc or water, each keeps it smooth but allows for different uses, it’s just a matter of experimenting and getting used to how you prefer to work with it. After clean up I handpainted some Mr Dissolved Putty ( I LOVE THIS STUFF) to even out the surfaces and create some nice rounded edges. If you haven’t used this, get some, it’s like thinning out a high quality putty so that you can paint with it, it’s a bit thicker that Mr Surfacer 500 but with the two products combined you can do so much with them, you’ll see the difference below (keep in mind there’s be NO SANDING on any of these belt pieces as the magic sculpt is still not cured so I can’t sand).
I’ll need to add some more bands on the top belt and maybe sand a little once it’s all set tomorrow to even out the surface as it’s a little rough. Also the curve at the top of the buckle needs a little attention to get it to look right but otherwise it’s taking shape!!
Time: 9hrs 33mins
Total Time : 87hrs & 5mins
-------------------------------
It’s been a whole month since I did anything!!! Argh, got sidetracked with other things like trying to make moulds and then buying a ball jointed doll!!!! I’ve made some good progress with Shuichi and he’s finally looking reasonably like I want him to. I really need to knuckle down and finish this as I have a commission mod to next and I’ll like to get started as soon as I can. First I had to fix this messy cloak, the never ending cloak, after spending many hours sanding (again) and filling the messy bits with putty, Mr Surfacer and Mr Dissolved Putty I was ready to prime to see the real uneven surface under the even gray colour as it’s difficult to see as is.I’ve had ongoing issues with spray cans and this was no exception, after about 3-4 quick passes my cans spit like crazy thus creating me extra work as I have to sand these spots off and prime again. Anyway I finally developed a technique involving two spray cans and a pot of warm water, after two sprays the can goes in the pot then I use the other can while the first can is warming back up. I alternated with this and left about 20 minutes or so between coats. I didn’t prime the model completely just a bit to get started and identify some problem areas of which there were PLENTY. I didn’t photograph them all but here’s a few circled.
After light sanding to smooth the surface and some puttying and more Mr Surfacer I’m ready to prime again. I like the finish and although I can’t really tell until it’s primed again, it looks smooth and even to me!!Next I attacked the shorts. I needed to make two belts with the two buckles. I toyed with the idea of making the belts from magic sculpt but was concerned that I wouldn’t be able to get the straight line, I also though some sort
of ribbon or leather string would work but they were both hard to work with so I ended up going for masking tape. I used Mr Hobby masking sheets which are precut to 1mm and 2mm, it was perfect for the smaller belt. I then handpainted Mr Surfacer over the masking tape to even out the surface and give it some strength. Then I used quilters tape for the bigger belt. Quilters tape is good because it’s not uneven at all and it’s really thick, it’s thicker than masking tape. I also used Mr Surfacer on it.Then I lightly sanded the surface and cleaned it up along the edges with a scalpel until it looked pretty smooth.
Then I used some Magic Sculpt to make the top and bottom buckles, this was very tricky. I started out using a curved carving tool to shape and manipulate but the buckles would keep falling off or moving slightly. Then I used a pin to carefully go around the outlines of the pieces and press them on to the belt, then I could manipulate the shape of the pieces, I opted for a rounded buckle in the end instead of a square one. The picture is of the initial bits before they are cleaned up.I then cleaned up the debris with a dry paintbrush and used the pin to hollow out any corners that had talc in them. You can use Magic sculpt with talc or water, each keeps it smooth but allows for different uses, it’s just a matter of experimenting and getting used to how you prefer to work with it. After clean up I handpainted some Mr Dissolved Putty ( I LOVE THIS STUFF) to even out the surfaces and create some nice rounded edges. If you haven’t used this, get some, it’s like thinning out a high quality putty so that you can paint with it, it’s a bit thicker that Mr Surfacer 500 but with the two products combined you can do so much with them, you’ll see the difference below (keep in mind there’s be NO SANDING on any of these belt pieces as the magic sculpt is still not cured so I can’t sand).I’ll need to add some more bands on the top belt and maybe sand a little once it’s all set tomorrow to even out the surface as it’s a little rough. Also the curve at the top of the buckle needs a little attention to get it to look right but otherwise it’s taking shape!!
Subscribe to:
Posts (Atom)